TL;DR: If you’ve built a Streamlit app (or really any other Python app) locally and you want to share it with your coworkers and stakeholders, you will need to deploy it to the cloud on a private instance. You can do this with Docker and AWS EC2 fairly quickly and affordably, just be aware of the security risks and scaling limitations.
If you’ve come to this article, you’ve either already created a Streamlit app to show off some proof-of-concept - or you’re thinking about it - and you’re trying to figure out how you would then take this to the next step and deploy it to a production environment so that you can share your work with your colleagues and stakeholders.
In this post, we’re going to be talking primarily about Streamlit, but this guide is applicable for nearly any python data app such as plotly dash, Gradio or flask. Streamlit happens to be one of the most popular options given how fast it is to spin up.
If you want to jump ahead, here are they key steps:
- Step 0: Understanding the risk and limitations of deploying and managing your own Python data app
- Step 1: Create your app and run it locally
- Step 2: Build a Docker image and run the container locally
- Step 3: Spin up an EC2 instance (we’ll use the free tier)
- Step 4: Deploy your Docker image to EC2
And if you’re a visual learner, check out our video:
What is Streamlit and why use it?
Streamlit is a Python data application framework. It’s designed for individuals such as data scientists and engineers to quickly build light-weight browser-based reports and apps with no front end experience. It’s open source and free, so a great way to quickly get started, especially if you have experience with Python and no access to front end talent. Let’s say you want to create a dashboard using Python, or you want to create an app that your stakeholders can upload a file to which then gets automatically processed and cleaned, Streamlit would be a great solution.
Streamlit is one of many open source Python application frameworks. Gradio, Plotly and Taipy are comparable in many ways, each with their own pros and cons. Regardless of which you use, if you’ve built a prototype locally and you want to share it with your colleagues, you will need to find a way to deploy it to the cloud. Streamlit does have a free hosting service, however, it’s not designed to support applications that require authentication or enterprise-level security and scalability. Their cloud service is really designed for hobbyists to showcase their applications.
Why deploy Streamlit to the cloud?
Let’s say you’re a data scientist or engineer, you wanted to prototype a report to get a feel for what it would look like. Or perhaps you built an app that’s designed to process and clean uploaded CSV or Excel files. This would be fairly easy and quick to do using Streamlit on your local machine. And perhaps you show your coworkers and they get excited when they see your work. Now the question is: How do you deploy this analytics report or Python data app in such a way that your coworkers can start to use it as well?
To accomplish this, you’re going to have to deploy your Python data app to a cloud hosted provider such as AWS, GCP or Snowflake. Note: Streamlit was acquired by Snowflake in 2022 and they’ve since then been building a deeper integration with the Snowflake platform. There are now quicker ways to deploy Streamlit apps directly within Snowflake using Snowsight if you’re already a customer. However, deploying apps within Snowflake may be easier, and more secure, but some of the limitations listed below remain.
Warning label: understand risks and limitations
This is the part where we tell you to be careful if you try this at home. Python apps such as Streamlit make it incredibly easy to get started, but they’re not without risks. Ultimately, even though you’re not writing any front end code, you are still building an application that accesses your data and can run code. And with that comes the risk that exists with any other web-hosted application.
If you have deep experience deploying web applications, or if your app doesn’t contain any sensitive data, you may be able to skip this section, otherwise, please read carefully.
Security and access
If you’re deploying an enterprise application or dashboard that displays or manipulates non-public corporate data in any way, shape, or form, you need to make sure that your Streamlit app is either behind a secure login or a corporate VPN, or both.
If you do have to build your own login, make sure you read your corporate password and login policy and you’ll also want to make sure that you follow industry best practices. For example, you should require strong passwords from your users, you should enforce password updates, and you shouldn’t store unencrypted passwords (just to name a few best practices).
Security and privacy goes beyond just logins and passwords. A few other considerations:
- You will want to make sure your network security configurations are properly set to ensure that all ports and endpoints are adequately protected
- You need to ensure that you’re properly encrypting all sensitive data in transit and at rest
- You may need to handle Personally Identifiable Information (PII) or Personal Health Information (PHI) in specific ways according to internal policies or regional laws and regulations
This list is not exhaustive and will vary based on your circumstances. If you’re unsure about what you need to do to secure your corporate data, consult with your CTO, infrastructure or IT department.
Scalability
Before you invest too much in a single framework, consider who your users may be and what usage patterns you expect. Streamlit and similar Pytho data application frameworks can easily handle one user at a time on small datasets but may start having issues when dealing with gigabytes of data across hundreds of users.
Here are some questions for you to consider:
- How many users do you expect daily, weekly or monthly?
- How many concurrent users do you have during any given session?
- How much data should the app be able to handle?
There’s no clear cut answer as to what Streamlit does or doesn’t support, all these factors can have an impact. If you’re unsure, you can always experiment and iterate, and revisit your setup if your app becomes wildly successful.
State management
There are two aspects to state management for you to consider:
- Managing the state of variable within the app as a single users uses it
- Managing the state of variables as multiple users use the same app
Streamlit, and similar Python data application frameworks, have various mechanisms to manage states, but it can get very complicated very quickly. Especially if you expect multiple users to use the same application at the same time. If you have a button that changes variable “foo” from A to B and vice versa, if two users press it at the same time, how should it behave?
As with the question of scalability, if you’re unsure, you can always launch your application and address these issues if and when they come up.
Step-by-step instructions to deploy Streamlit to the cloud
Now that we’ve laid out the risks and limitations of Streamlit and similar python data apps, let’s roll up our sleeves and get your local app on the web.
Step 1: Create your app and test it locally
We’ll keep this section brief. We’ll assume that you already have an app that you want to deploy. That said, if you don’t, check out Streamlit’s starter pack.
In this example, we’ve created an app for our fictional company Superdope. This app simply shows the number of widget sales over time by product group.
In this example we did not change the default Streamlit port from 8501. If you do, please take note, this will be important for your Docker configuration.
Step 2: Build a docker image and run the container locally
Since we’re going to be deploying our app on a different machine than what we’ve built it on, our best bet to ensure that it runs smoothly is to use Docker. Docker is an open-source platform that allows developers to package applications and their dependencies into lightweight, portable containers. These containers ensure that an application runs consistently across different computing environments, from development to production. Docker simplifies deployment by isolating the application from the underlying infrastructure, making it easier to scale and maintain.
Make sure you have Docker installed and running (if you’re on a Mac just open up the Docker desktop application).
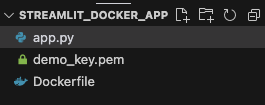
To your streamlit_docker_app directory, add a Dockerfile:

Your Dockerfile should contain the necessary configuration to ensure that you have the right Python version and packages installed to run your app. Your Dockerfile may need to look different, but if you’re just following this example, you can use this one:
Before we try deploying a Docker container to the cloud, let’s make sure we’re able to deploy it locally. From the command line, run the following commands:
This may take a minute, but once completed, you should be able to open up your browser and view your app if you go to http://localhost:8501/
If you were able to run your Streamlit app locally but this doesn’t work you may need to adjust your Docker configuration.
Step 3: Spin up an EC2 instance (free tier)
Now that we’ve been able to run our Streamlit app from a Docker image locally, let’s get our remote instance configured. We will be using AWS EC2, but you can use other similar virtual machines. EC2 is generally best-in-class and also offers a free tier.
If you don’t already have an AWS account, go ahead and create one. You will be asked to enter your credit card information. We will be using a free tier, but note that your card will get charged if you use a paid configuration.
Once you’ve created your account, go to your EC2 dashboard. Click on “Launch instance”

This will bring you to a workflow that will ask you for the type of instance you want to create. To stay on the free tier, make sure you follow instructions carefully at this stage.
Choose the following options:
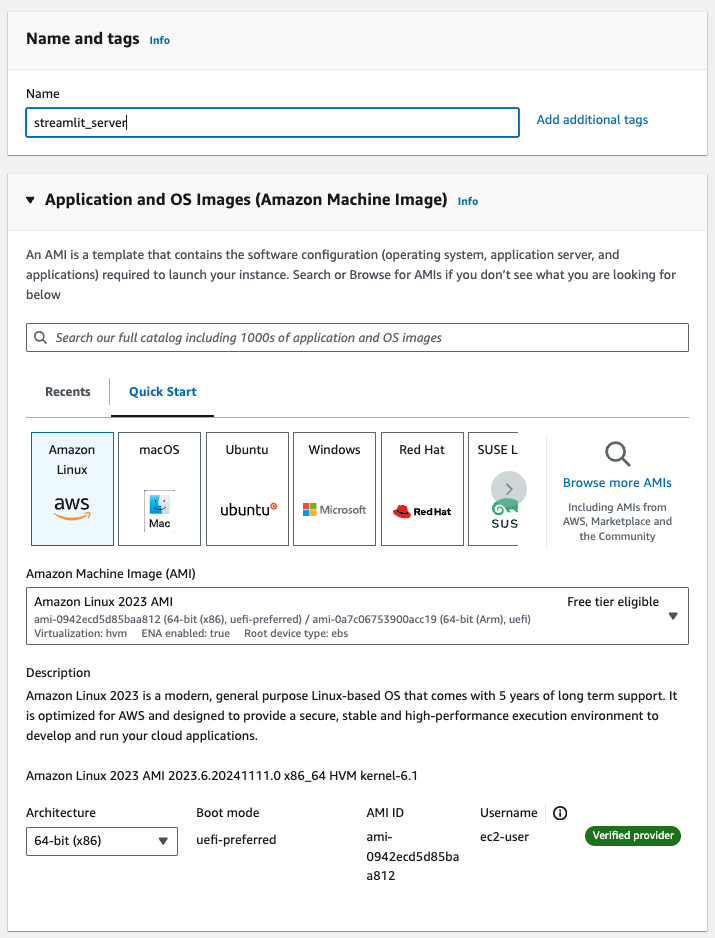
- Enter a name for your instance (you can always edit this later and doesn’t impact the rest of the flow)
- Select “Amazon Linux” for your machine
- Select “Amazon Linux 2023 AMI (or whatever image, make sure it has the “Free tier eligible” tag

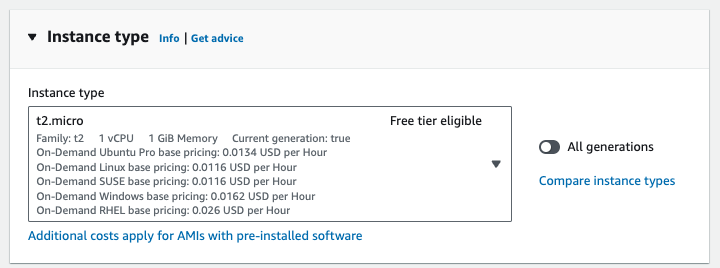
Stay on “t2.micro” for the instance type.

If you don’t already have a key pair, create a new key pair and save the .pem file

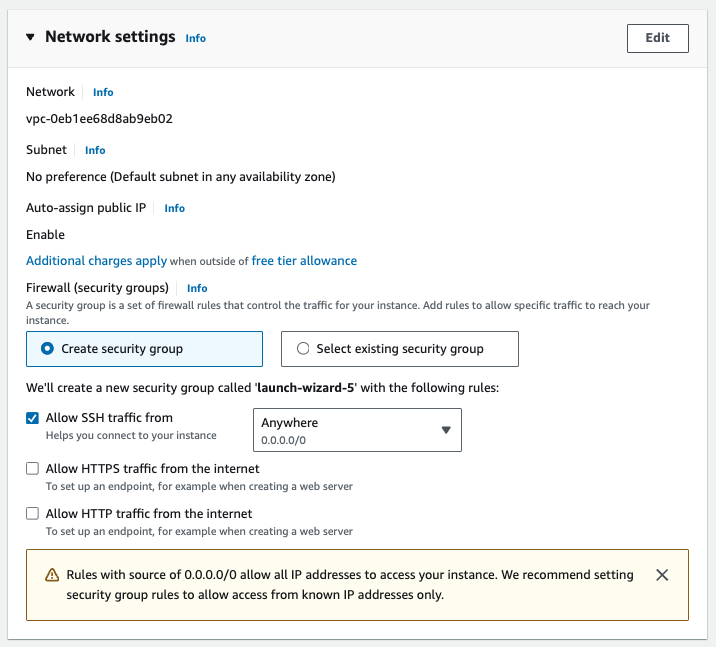
For your network settings:
- Select “Create security group” unless you have an existing security group you would like to use
- Check “Allow SSH traffic” from “Anywhere”. You need this to transfer your files from your local machine

Once you’re done with the setup and the machine is launched, click on the instance ID then “Connect” in the top right hand corner. Select “Connect using EC2 Instance Connect” and this will launch the command line interface for your new instance.

There’s one more important step to ensure that you can access your Streamlit app from a browser. From your instance page click on the “Security” tab then click on the security group name, then again, from that next page click on the security group ID.
Select “Edit inbound rules”

Add a new rule and select “All traffic” from the first dropdown and “0.0.0.0/0” in the third dropdown.
This is another great time to remind you to carefully consider your security requirements and configuration to avoid exposing any sensitive information.
Once you’ve done these steps, your EC2 instance is ready to be used.
Step 4: Deploy your Docker image to EC2
From your EC2 command line interface (we should have this open from the previous step when we launched “Connect”), you need to do a few things to prepare your instance:
- Install Docker
- Start the Docker service (remember, on your local laptop you opened up the desktop app, but that isn’t available here)
- Create the folder where you want to store your Streamlit app
In the following commands, in the EC2 instance we’ll be using “sudo”, but you can adjust permissions as you see fit if you don’t want to repeat that command.
Take note of what folder name you choose, you will need this when transferring your files.
Now from your local machine, move your .pem file to your streamlit_docker_app folder and from the command line, change the permission on that file:
Now we’re ready to transfer our files over to our new EC2 instance:
In the command above, replace {ec2_public_ip} with the public IP address of your EC2 instance and change the files or directories as needed if you chose your own names.
Let’s now build the image from EC2. Go back to your EC2 command line:
Once it’s done building, run the container:
Now if you open a new browser tab and enter your public IP address, you should see your Streamlit app!
Closing thoughts on deploying Streamlit and other Python data apps to the cloud
Hopefully this post gave you the tools you needed to go from a cool proof of concept running locally, to something that you can start sharing with your colleagues. Python data apps are extremely powerful tools to quickly build custom dashboard and reports or apps that are specific to your business needs.
However, if you are doing this in a corporate setting, be sure to carefully consider any security and privacy risks. Exposing any service to the web immediately exposes it to the entire world and if someone is able to exploit it, they will find a way. Bad actors are unfortunately all too common. It’s also important to consider your scale needs, but you can always start small and iterate if your app gains traction.
At Fabi.ai, we believe in empowering builders to quickly build custom data reports, apps or workflows without the hassle of dealing with front end language and frameworks or managing the security and deployment. With the combination of SQL, Python and AI, builders can quickly deploy apps in a secure, production-grade and collaborative environment. You can get started for free in less than 2 minutes.


